
When it comes to privacy-preserving machine learning, data scientists are usually happiest when they can build their models from big data sets with a rich set of attributes. The problem is that most sensitive data that companies collect is legally restricted to specific business purposes, such as delivering products or services and supporting the customer lifecycle. Personal information such as government IDs, medical record numbers, credit card details, birthdates, and similar private information are not always authorized for analytic use cases.

So what do you do when machine learning algorithms and the people who build and test them should be denied access to the sensitive information embedded in those datasets?
In this guide, we’ll show you how to build a privacy-aware machine learning solution using Okera.
Tutorial Assumptions and Environment
This tutorial assumes the following:
- The business wants to estimate how certain demographic information influences medical costs.
- The company collects patient medical data including name, medical record number, region, age, gender, BMI, phone number, and so on.
- The data science team is responsible for delivering medical cost predictions to the business.
- You are on the data team responsible for provisioning data to the data science team.
- To comply with many data privacy regulations, the organization’s Data Protection Officer (DPO) requires that:
- Data scientists and analysts cannot work with personal information that identifies any particular patient.
- Patients can exercise DSARs (data subject access requests) such as right to be forgotten or right to restriction of processing so that none of their data is usable for analytics and predictive modeling.
The tutorial environment is self-contained within a trial instance of Okera running on AWS. It includes:
- A CSV file with fictitious data stored on a publicly accessible Amazon S3 bucket
- The Okera Dynamic Access Platform for policy authorizing, enforcement, and auditing
- Open JupyterHub for data modeling
Develop Business-Friendly Data Policies
One of the big a-ha! moments when working with Okera is that you’re not defining data access controls specific to every data silo. Instead, you create modern, comprehensive, and comprehensible policies that are platform agnostic. The distinction is significant. Okera policies work with higher level authorization concepts that can be developed and validated in collaboration with all data stakeholders like the DPO, data security team, and business.
For this tutorial, you’ll create a general policy with these business-friendly permissions:
- Analysts cannot access PII such as medical record numbers (MRN) and patient phone numbers
- Analysts cannot use any information for patients who have exercised their opt-out right to have their data deleted or restricted.
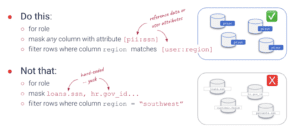
Why You Should Define Policies with Metadata (ABAC)
The old way of implementing data access controls by naming resources like tables and columns is brittle and does not scale. With Okera’s metadata-driven approach, you work with your data stakeholders to agree on user roles and data attributes, define policies, and then let automation take it from there.
Automatically Tag Data with Custom Attributes
So let’s get started! The trial version of Okera is pre-populated with user roles and tags (data attributes).
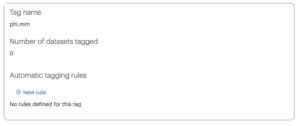
Okera’s library of pre-built tags does not include medical record numbers, so we’ll create one now.
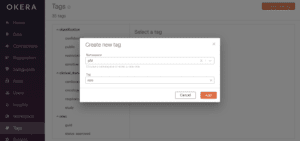
To create a new tag that detects medical record columns:
- Log in as admin and click Tags on the left menu panel.
- Click the orange [ Create a new tag ] button in the upper right corner
- Choose phi from the Namespace dropdown.
- Enter mrn in the Tag text box and click Add.
To create auto-tagging rules:
- Click New rule
Note: the ability to create auto-tagging rules may be disabled in your trial environment. Contact us to learn more.
- Under Apply rule to, select Column names and de-select Cell content

- Enter mrn in the rule name
- Enter this regular expression to automatically identify and tag any column that contains the character sequence mrn in its name
.*mrn.*
- Repeat steps 1-4 to create a new autotag rule, replacing “mrn” with “phone“.
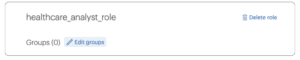
Next, assign user groups to Okera’s healthcare_analyst_role. With Okera you don’t need to manage users and groups; this information is passed to Okera, which authenticates each request. This further allows you to separate policies from the platform; a single role in Okera can map to multiple different user groups from different authentication systems.
To assign user groups to Okera roles:
- Click Roles in the left menu panel.
- Select healthcare_analyst_role
- Click Edit groups.
- Choose general_analyst_group from the dropdown list and click Save.
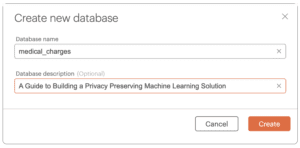
As mentioned above, Okera policies are data platform agnostic. Okera uses the term database to conceptually group similar policies together for easier management. Okera does not ingest or store your data.
To create a virtual Okera policy database:
- Click Data in the left menu panel.
- Click the orange [ Create new database ] button in the upper right corner.
- Enter medical_charges in the Database name text box and click Create.
Note that we don’t have any data registered yet. With Okera, that’s OK! In this tutorial you’ll see how you can author a policy first, and then register data after the policy is approved by your data stakeholders.
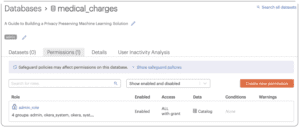
To create a new policy:
- Click the Permissions tab on the medical_charges database.
- Click the orange [ Create new permission ] button.
- Select healthcare_analyst_role.
Note: if no user groups are assigned to the role, follow the instructions above to assign general_analyst_group to the healthcare_analyst_role. - Click Add an access condition
This is where we map how people with different roles can or cannot work with data. Notice that we leave the Access level at “Select.” This gives users the privilege of querying data. Now we place conditions on that access according to our DPO’s mandates.
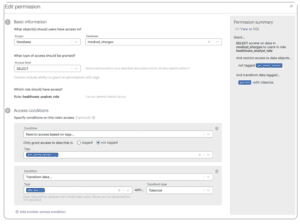
- Select Restrict access based on tags… from the Condition dropdown and select not tagged.
- Select phi:phone_number from the Tags dropdown. Note that with Okera you can select multiple tags in one access condition.
- Click Add another access condition and select Transform data… from the Condition dropdown.
- Choose phi:mrn from the Tags dropdown and Tokenize from the Transform type dropdown.
This policy grants authorized users the ability to work with data that is not tagged phone_number and tokenizes data tagged mrn.
We now only have to implement the policy that prevents analysts from working with any patient data that has been flagged opt-out.
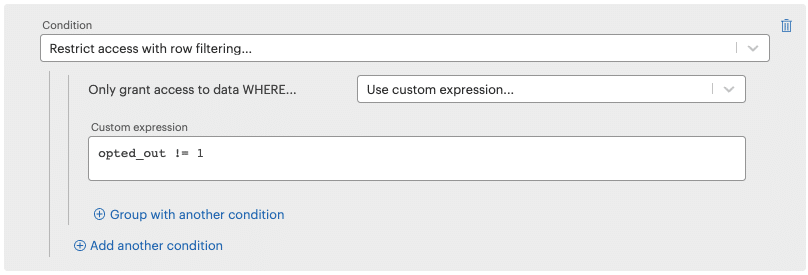
To filter the opt-out rows:
- Click Add another access condition
- Select Restrict access with row filtering… from the Condition dropdown
- Choose Use custom expression… from the Only grant access to data WHERE… dropdown. Enter the following and click Create new permission.
opted_out != 1
Congratulations! In a few short steps you created a universal policy control that is understandable by data stakeholders and can be consistently and dynamically enforced across the enterprise.
Register Data with the Okera Policy
All we have to do now is register data with the policy.
The real power of using Okera comes later when you register additional datasets with this policy. You gain enormous economy of scale because the incremental effort to register new datasets is so low. And your DPO and security officers are happy because they know policies are enforced consistently across the enterprise. For this tutorial we’ll start small by registering a simple CSV file stored in an Amazon S3 bucket.
To register the sample dataset with the policy:
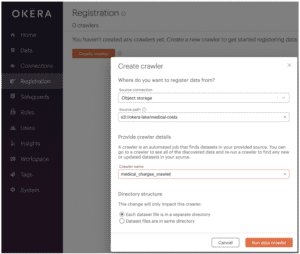
- Click Registration in the left menu panel.
- Click the orange [ Create crawler ] button in the upper right corner.
- Enter the file Source path: s3://okera-lake/medical-costs
- Enter a name for the crawler, e.g., medical_charges_crawler.
- Click Run data crawler.
Okera crawls and automatically applies the Okera classification tags to your data.
To see the crawler results:
- Click Go to the crawler.
Note: if you do not see this button, click Registration in the left panel. - Click the name of the crawler, e.g., medical_charges_crawler.
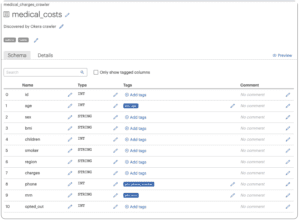
- Click the name of the dataset, e.g., medical_costs.
- Notice that Okera automatically tagged the mrn, phone, and other sensitive fields. These tags make it much easier to automatically and consistently enforce universal data policies.
- Click your web browser’s back button and click Register…
- Click Existing database and select medical_charges from the dropdown menu. Click Register dataset.
That’s pretty much it for creating universal policies and registering data. Within a matter of minutes our data science team can query the data they need and get work!
Interact with Data from a Jupyter Notebook
To access data through a Jupyter notebook, the data scientist needs Okera connection information and an access token. This is because direct access to the data (the S3 bucket in this case) should be locked down. The only way to get access to this data is through Okera, which authorizes and audits each query. This is to allow the analyst to fulfill the business requirements while protecting sensitive information from inappropriate access.
To acquire Okera connection information and credentials:
Log out of Okera and log back in as demo_user2.
Tip: refer to yourUsing your Okera trial environment, connect to Open JupyterHub:
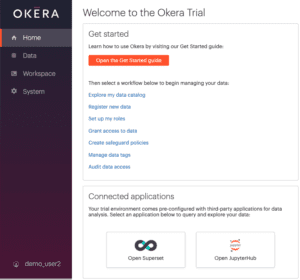
- Click Home in the left menu panel.
- Click Open JupyterHub at the bottom of the page.
Note: Open JupyterHub is offered as a convenience in the Okera trial environment. If you are using a commercial edition of Okera, you can use your own Notebook. The way you connect to data through Okera with your own Notebook is the same.
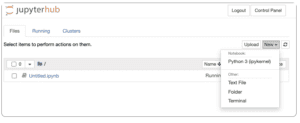
- If you’re automatically logged into JupyterHub as another user, log out and login as user demo_user2.
- In Jupyter, click New and select Python 3 (ipykernel) to open a new Notebook.
- Enter the following code into the first cell. Replace yourtoken and yourhost with your values from the preceding connection table. If you’ve been following along, port and dataset should not need modifying, but check and adjust if necessary.
import okera.odas
from okera import context
user_token='yourtoken'
ctx = context()
ctx.enable_token_auth(token_str=user_token)
# scan data into a pandas dataframe
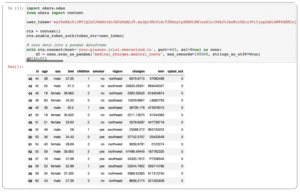
with ctx.connect(host='yourhost-planner.trial.okeracloud.io', port=443, ssl=True) as conn:
df = conn.scan_as_pandas("medical_charges.medical_costs", max_records=100000, strings_as_utf8=True)
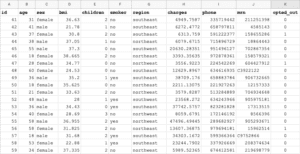
df[42:57]
In this code, we:
- Start the context object and enable authentication with the user’s token.
- Supply the location of our Okera planner and port number to establish the connection to Okera using the context object. The planner will be different for each organization.
- Scan the medical_costs dataset from the medical_charges database into a pandas dataframe.
- View records 42 to 57 on the pandas dataset because this range has a good number of opted-out records so that we can check that these patients’ records will not be visible to the data scientist.
- Click > Run! Notice: Okera dynamically implemented the policy so the phone fields is missing, the mrn field is tokenized, and you only see rows where opted_out is not set to 1.
To see how the same data scans are authorized dynamically, follow the steps above to acquire the Okera admin’s token, replace the user_token value in the code, and run again. You’ll see the admin has access to all columns and all rows, which is consistent with their data policy.
How to Build a Machine Learning Prediction Model
To create a more efficient model, we’re going to take a minute to encode categorical data like “male/female” into a simpler format that represents string data as integers. We’ll do the same with the smoker and region fields too.
To achieve this, we’ll use the scikit-learn label encoder. Enter this code in the next cell and click > Run on the toolbar:
!pip install sklearn
Choose Kernel > Restart & Run All to make sure sklearn loads successfully.
Now transform the bmi and charges fields into floating point numbers to prevent them from being interpreted as strings. Enter into the next cell and click > Run on the toolbar.
from sklearn.preprocessing import LabelEncoder
le = LabelEncoder()
df['sex'] = le.fit_transform(df['sex'])
df['smoker'] = le.fit_transform(df['smoker'])
df['region'] = le.fit_transform(df['region'])
df["bmi"] = df.bmi.astype(float)
df["charges"] = df.charges.astype(float)
Enter into the next cell and click > Run on the toolbar:
df.head()
You should see something similar to the following:
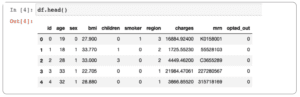
The categorical data has been transformed to numerical values, which is easier for our model to work with. Now we can visualize a correlation heat map of our dataset to get an idea of what contributes most significantly to the medical charges.
Run the following in a new cell to install matplotlib and seaborn, which we’ll use for data visualization.
!pip install matplotlib
!pip install seaborn
And now enter the following code into the next cell and click > Run on the toolbar
import matplotlib.pyplot as plt
import seaborn

df.drop(['opted_out', 'id', 'mrn'], inplace=True, axis=1)
plt.figure(figsize = (10, 7))
seaborn.heatmap(df.corr(), annot = True);
Here we drop the opted_out, id, and mrn columns as they don’t influence medical charges.
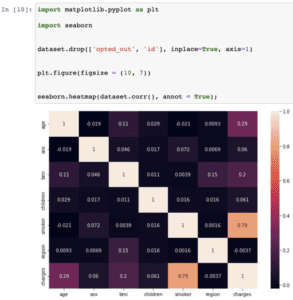
We can see that medical costs are mostly strongly influenced by values of the smoker, age and bmi fields.
Train the Model with Linear Regression
Let’s train a linear regression-based prediction model for our dataset. Enter the following code into a new cell and click > Run on the toolbar:
x = df.drop(['charges','region'], axis = 1)
y = df['charges']

from sklearn.model_selection import train_test_split
x_train, x_test, y_train, y_test = train_test_split(x, y, test_size = 0.3, random_state = 0)
from sklearn.linear_model import LinearRegression

lr = LinearRegression()
lr.fit(x_train, y_train)
lr.score(x_test, y_test)
Note that here we:
- Use the charges column as the y value and the remaining columns as the x values
- Split the data to a 70-30 train-test distribution
- Fit the training data to the model and test how it performs on the test data

We get a prediction score of 75%. We can further increase the accuracy of the score using polynomial features.
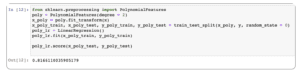
Type in the following code and click > Run on the toolbar:
from sklearn.preprocessing import PolynomialFeatures
poly = PolynomialFeatures(degree = 2)
x_poly = poly.fit_transform(x)
x_poly_train, x_poly_test, y_poly_train, y_poly_test = train_test_split(x_poly, y, random_state = 0)
poly_lr = LinearRegression()
poly_lr.fit(x_poly_train, y_poly_train)

poly_lr.score(x_poly_test, y_poly_test)
Using polynomial features, the prediction score increases to 82%.
The Future of Machine Learning Privacy
We’ve walked through a basic example of how to protect the privacy of patient data while still using it to its full potential. Of course, a real-world analysis would probably be more complicated, working on much larger and messier datasets. Scaling up with Okera is easy though, as you’ll find that the permissions model, data crawler, and platform scales easily with your data.
You can also go far beyond the simple example here of denying access to sensitive fields. You can also tokenize unique identifiers and apply other privacy-enhancing techniques such as dynamic row level filtering. To get learn more, read A Practical Guide to Data Anonymization and Soft Deletion and Using ABAC to Achieve Dynamic Row-Level Security, or go straight to Okera’s documentation to learn all about access control.
To learn how Okera helps companies gain full visibility into how sensitive data is used and how to standardize and simplify fine-grained access control across the enterprise, sign up for a free demo or contact us to learn more.