Connecting Tableau Desktop to ODAS
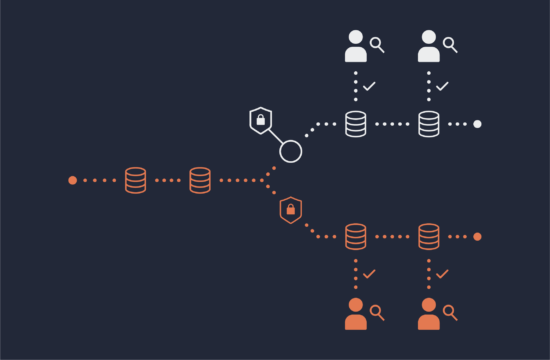
One great benefit of the Okera platform is its client-compute flexibility. Today you can integrate a variety of tools — Python, EMR, Cloudera CDH, Databricks, Hive, Spark, Presto, and more — with an ODAS cluster. The fine-grained access control ODAS provides ensures the client only receives data that is appropriate to the user.
What was missing until now, however, was an easy way to get started with a thin client, such as Tableau Desktop, that uses an ODBC or JDBC driver to connect to a data source. Okera’s 1.4 release answers that need with a Standalone JDBC configuration with a built-in Presto service. Now you can get to and start operating on datasets right away.
This blog details how you can connect a Tableau Desktop client. It’s intended for readers with a working knowledge of ODAS services who want to spread adoption among their Tableau users.
Building the Cluster
Once you’ve installed Okera’s Deployment Manager to a host, you can build a Standalone JDBC cluster using theocadmutility.
To build one, we first configure an environment for deploying ODAS and setting service properties, such as port assignments. We do this with a launch script that can be adapted to the conditions of the cloud environment and the customer’s operational requirements. You can list the ones you have like this:
$ ocadm environments list
id description launchScript name owner provider tags
--- ----------- ------------- ----------- ------- ---------- ------
1 launch-ec2.sh demo-abac admin AWS []
2 launch-ec2.sh demo-jdbc admin AWS []
To create a single-node ODAS cluster using an environment that’s already been initialized, we can then run:
$ ocadm clusters create --name=jdbc_test --numNodes=1 \
--type=STANDALONE_JDBC_CLUSTER --environmentid=2
The system will assign a cluster ID — 1, in this case — that you use to retrieve details on the cluster’s state through subsequent
The standalone JDBC cluster adds two new endpoints to the standalone service profile: one coordinator and one or more workers, the latter of which are co-located with ODAS workers in the cluster. You can list these endpoints using the cluster ID:
$ ocadm clusters endpoints 1
{
"canary:webport": [
"10.100.10.11:9098"
],
"cdas_rest_server:api": [
"10.100.10.11:5000"
],
"cerebro_catalog:hms": [
"10.100.10.11:9083"
],
"cerebro_catalog:sentry": [
"10.100.10.11:11060"
],
"cerebro_planner:planner": [
"10.100.10.11:12050"
],
"cerebro_planner:webui": [
"10.100.10.11:11050"
],
"cerebro_web:webui": [
"10.100.10.11:8083"
],
"cerebro_worker:webui": [
"10.100.10.11:11051"
],
"cerebro_worker:worker": [
"10.100.10.11:13050"
],
"presto_coordinator:clusterui": [
"10.100.10.11:14050"
],
"presto_worker:internal": [
"10.100.10.11:7792"
]
}
The presto_worker:internal endpointis typically not made available for direct access. If you do not have access to a Deployment Manager instance, you can ask a system administrator to create the cluster type and provide these endpoints for you. As you see here, these endpoints are returned byocadm as IP addresses. To connect via JDBC, you’ll need the fully-qualified host name for the host to authenticate the server identity.
Verifying the Presto Service
The presto_coordinator:clusterui location is the connection point for Tableau Desktop and other clients connecting with ODBC/JDBC.
Before configuring a connection, however, it’s not a bad idea to to ensure the service is operational. To do this, browse the endpoint and authenticate to ODAS. If the service is running at this location and your browser can authenticate the server’s certificate, you’ll be redirected to a web UI that looks like a dashboard. If that display shows at least one worker is running, you’re good to go.
NOTE: if the cluster has been configured with a self-signed certificate, your browser may warn you the site in unsafe, or may refuse to connect at all, depending on its security settings.
Configuring Tableau Desktop
Now you’re ready to connect with Tableau Desktop. We assume here you already have the software installed. If you’d just like to test-drive, Tableau Desktop is available for a 14-day trial without a license. The download and installation instructions are available on this page.
Once installed, close the application to install the driver, which you can download from this page. Choose Presto form the Data Source dropdown widget. Depending on your platform, you may end up downloading the driver or an entire bundle of drivers. If you get the bundle, you only need the Simba Presto driver.
If your ODAS cluster uses an SSL certificate from a trusted Certificate Authority, skip to the next section: you have what you need to connect. If you have a self-signed certificate, you’ll need to configure the Simba driver to accept its less-stringent properties.
Navigate to the location Tableau Desktop uses for driver configuration. On a Mac, this location takes the form /Users//Documents/My Tableau Repository/Datasources. Create a file named Presto.tdc and add the following configuration:
<?xml version='1.0' encoding='utf-8' ?>
<connection-customization class='presto' enabled='true' version='10.1'>
<vendor name='presto' />
<driver name='presto' />
<customizations>
<customization name='odbc-connect-string-extras' value='SSL=1;AllowSelfSignedServerCert=1;AllowHostNameCNMismatch=1' />
</customizations>
</connection-customization>
The properties set here will a) enable SSL; b) allow a self-signed certificate for server authentication; and c) accept a certificate if the hostname given doesn’t match the one listed in the certificate. It’s not the most secure option, but it does let you test the connection and access to ODAS data right away.
Validating Usability
Now you can open the Tableau Desktop application. In the Connect panel, look under the subsection To A Server for the More… option. Find Presto (listed alphabetically) and select it. You should then see this panel:
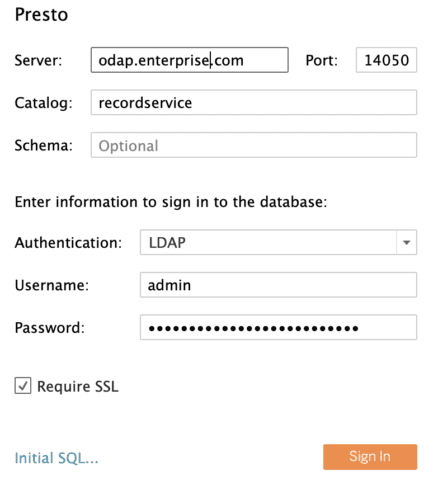
Enter the FQDN of the coordinator’s host and its port assignment (the default is 14050). You can authenticate with LDAP credentials, using either your LDAP password or Java Web Token string, depending on the cluster’s configuration. The username-only option in Tableau isn’t supported as there is no password challenge. The catalog name, recordservice, is the entry point to the ODAS catalog. Be sure to check the Require SSL box and click the Sign In button. If all goes well, you should see this view:
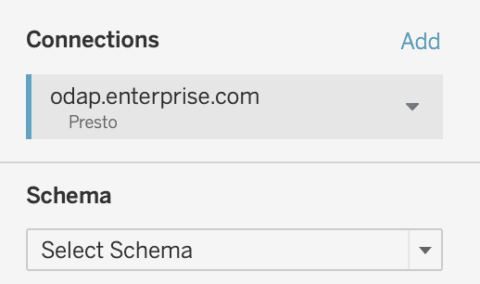
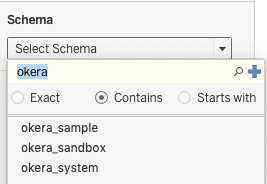
A Tableau Desktop schema maps to what ODAS calls a database. Clicking Select Schema will open a search panel for listing database objects. I used ‘okera’ to match our sample databases, as seen here:
Once you select a database, another dialog to search for datasets will appear. Here I used ‘s’ to get some lazy matches:
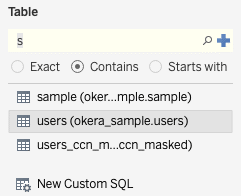
Now you can drag a table into Tableau Desktop’s workspace and do Tableau stuff to it.
Conclusion
That’s it! Now you can connect any Tableau Desktop instance to an ODAS Standalone JDBC cluster. From the moment Tableau Desktop connects, the user can create visualizations and reports on just the data they’re permitted to access.
If you’ve got questions about making this work or run into some blockers, please free to reach out.